Introduction
Today, following up on Debounce, let's implement Throttle in both vanilla JavaScript and React. In my previous post (link) on implementing Debounce, I gained a much deeper understanding of closures and React's re-rendering behavior. Thanks to that, implementing Throttle this time was significantly faster than Debounce. To put it in numbers: Debounce required writing 11 files to reach the final implementation step by step, while Throttle only needed 5 files to arrive at the final code!
If you're not familiar with the concepts of Debounce and Throttle, please check out this post (link) first!
Since this post is a continuation of the Debounce implementation series, reading the previous post (link) first will help you follow along more easily. (Fair warning: it's a long read.)
Just like last time, we'll first implement Throttle in vanilla JavaScript, then port that code over to React.
Let's do a quick recap of what Throttle is. Throttle is a technique that controls the frequency of function calls by invoking the callback at a fixed interval when events fire continuously.
1) Implementing in Vanilla JavaScript
So how do we actually implement Throttle?
The core principle is as follows:
Event fires → execute the callback, then wait for a set duration → while waiting, any further events are ignored → once the wait is over, execute the callback again
Here's where Throttle differs from Debounce. Debounce needed to cancel previously scheduled callbacks repeatedly, so it stored the timer ID and called clearTimeout on each new event. Throttle, on the other hand, only needs to track whether enough time has passed since the last execution. This "have we waited long enough?" state is stored as a boolean, and we'll call that variable isWaiting.
Based on this principle, let's look at two vanilla JavaScript examples of Throttle — just like with Debounce, there's a version using a global variable and a version using a closure. The difference between the two is the same as explained in the Debounce post, so I'll keep the explanation brief.
Example 1: Storing isWaiting as a global variable
<!DOCTYPE html>
<html lang="en">
  <head>
    <meta charset="UTF-8" />
    <meta name="viewport" content="width=device-width, initial-scale=1.0" />
    <title>Throttle - example 1</title>
  </head>
  <style>
    body {
      height: 1000vh;
    }
  </style>
  <body>
    <script>
      let isWaiting = false; // stored as a global variable

      const throttle = (callback, time) => {
        if (isWaiting) return; // return immediately if still waiting

        isWaiting = true; // set to true so we start waiting
        callback(); // execute the callback

        setTimeout(() => {
          // reset to false after the wait period
          isWaiting = false;
        }, time);
      };

      const scrollHandler = (e) => {
        console.log('scroll');
      };

      window.addEventListener('scroll', () => {
        throttle(scrollHandler, 500);
      });
    </script>
  </body>
</html>
Looking at just the JavaScript: if isWaiting is true (we're in the waiting state), we return immediately to prevent the callback logic from running. If isWaiting is false (not waiting, meaning enough time has passed), we set it to true to start a new wait period and execute the callback. Finally, after the set duration, we reset isWaiting back to false via setTimeout to signal that the wait is over.
As noted in the Debounce post, storing isWaiting as a global variable risks unintended mutations and reduces reusability.
Example 2: Using a closure
The drawbacks mentioned above can be addressed by using a closure. Storing isWaiting inside a closure protects the variable from external modification, and since a new closure is created each time the function is invoked, reusability improves as well.
<!DOCTYPE html>
<html lang="en">
  <head>
    <meta charset="UTF-8" />
    <meta name="viewport" content="width=device-width, initial-scale=1.0" />
    <title>Throttle - example 1</title>
  </head>
  <style>
    body {
      height: 1000vh;
    }
  </style>
  <body>
    <script>
      const throttle = (callback, time) => {
        let isWaiting = false; // isWaiting stored inside the closure

        return (...args) => {
          // returns a function that handles the throttle logic
          if (isWaiting) return;

          isWaiting = true;
          callback.apply(this, args);

          setTimeout(() => {
            isWaiting = false;
          }, time);
        };
      };

      const scrollHandler = (e) => {
        console.log('scroll');
      };

      const throttledHandler = throttle(scrollHandler, 500); // the function returned by throttle

      window.addEventListener('scroll', throttledHandler);
    </script>
  </body>
</html>
The throttle logic is identical — isWaiting has simply moved inside the function. The difference is that throttle now returns a function that handles the throttle logic, and we use that returned function as our event handler.
2) Implementing in React
Let's first define what we're building in React. Similar to the examples above, one of the most common use cases for Throttle is handling scroll events, so let's assume we're implementing infinite scroll driven by a scroll event.
The basic structure looks like the above, and we'll apply Throttle to control the scroll event. In a real infinite scroll implementation you'd need a lot more logic, but we're keeping it simple here.
Since I'd already worked through all the pitfalls when implementing Debounce, I was able to get Throttle working quickly without hitting the same walls. That's why this post will be noticeably shorter than the last one.
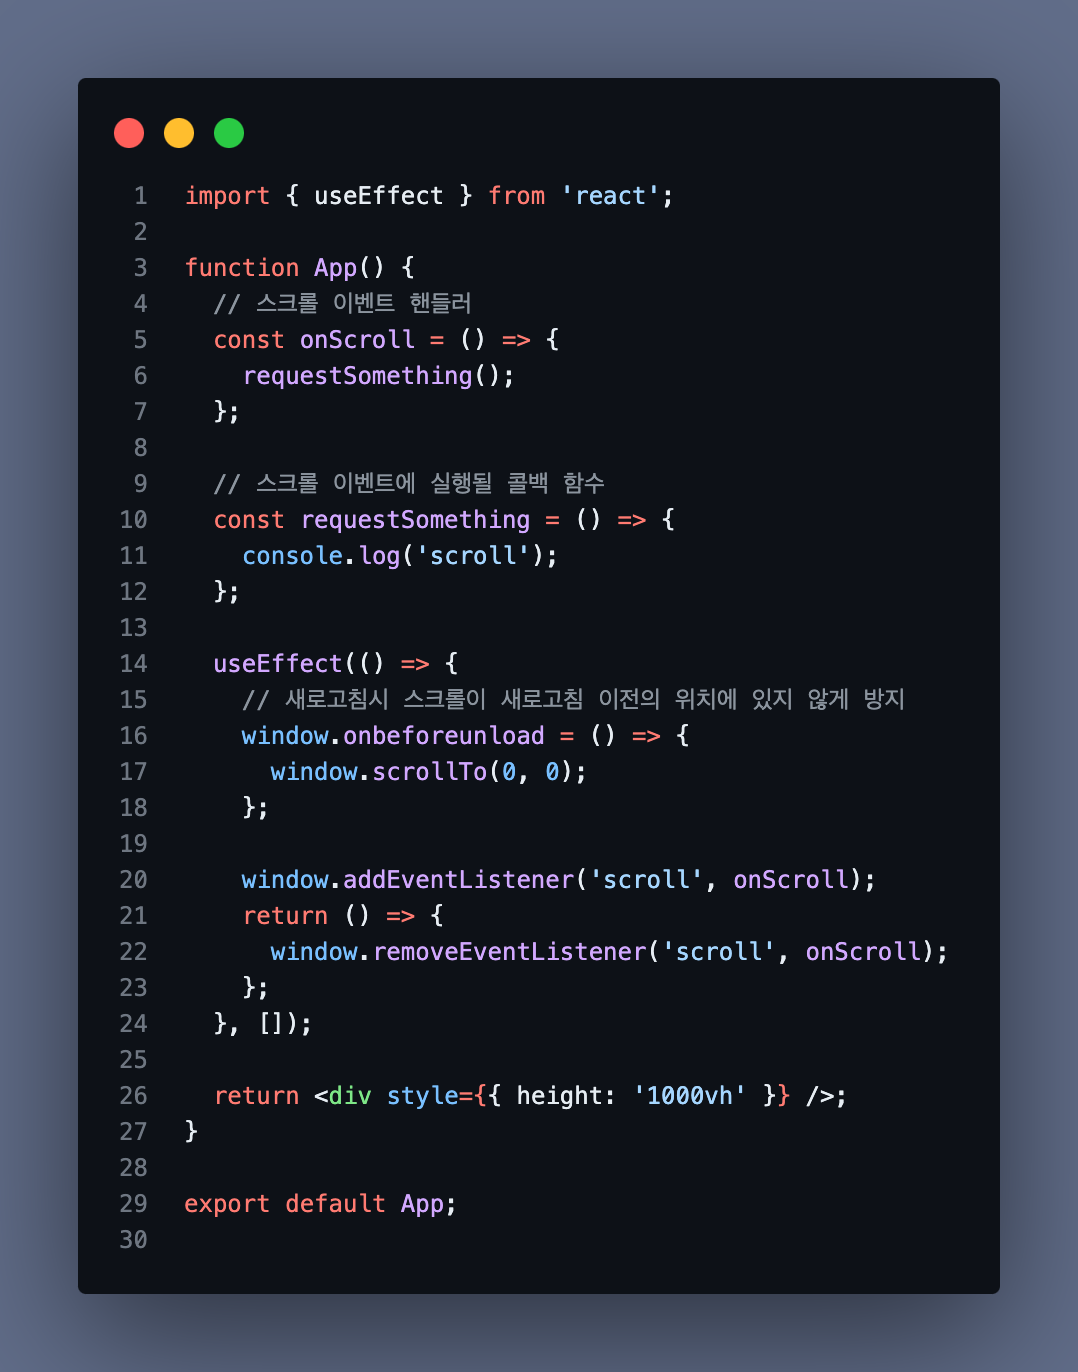
Step 1. Porting the vanilla JavaScript (closure) example directly to React
Let's start by taking the closure-based example from above and porting it to React as-is.
import { useEffect } from 'react';

function App() {
  // scroll event handler
  const onScroll = () => {
    console.log('scroll event');
    requestSomething();
  };

  // callback function to run on scroll
  const requestSomething = () => {
    console.log('callback called');
  };

  const throttle = (callback, time) => {
    let isWaiting = false;

    return (...args) => {
      if (isWaiting) return;

      callback.apply(this, args);
      isWaiting = true;

      setTimeout(() => {
        isWaiting = false;
      }, time);
    };
  };

  const debounceHandler = throttle(onScroll, 500);

  useEffect(() => {
    window.onbeforeunload = () => {
      window.scrollTo(0, 0);
    };

    window.addEventListener('scroll', debounceHandler);

    return () => {
      window.removeEventListener('scroll', debounceHandler);
    };
  }, []);

  return <div style={{ height: '1000vh' }} />;
}

export default App;
Does this work? It works perfectly!
When implementing Debounce, things broke down at this very stage. The onChange event needed to fire every time, but the logic attached to it (like an API call) had to be rate-limited. So we couldn't apply Debounce to the onChange handler itself — it had to be applied only to the callback (requestSomething).
Scroll events, however, are different — we can apply Throttle directly to the scroll event itself, so no such issue arises here.
Step 2. Extracting into a custom hook
Now let's extract the logic into a custom hook right away.
import { useEffect, useRef } from 'react';

function useThrottle(callback, time) {
  const isWaiting = useRef(false); // use useRef for values unrelated to rendering

  return (...args) => {
    if (isWaiting.current) return;

    callback.apply(this, args);
    isWaiting.current = true;

    setTimeout(() => {
      isWaiting.current = false;
    }, time);
  };
}

function App() {
  // scroll event handler
  const onScroll = () => {
    console.log('scroll event');
    requestSomething();
  };

  // callback function to run on scroll
  const requestSomething = () => {
    console.log('callback called');
  };

  const debounceHandler = useThrottle(onScroll, 500);

  useEffect(() => {
    window.onbeforeunload = () => {
      window.scrollTo(0, 0);
    };

    window.addEventListener('scroll', debounceHandler);
    return () => {
      window.removeEventListener('scroll', debounceHandler);
    };
  }, []);

  return <div style={{ height: '1000vh' }}></div>;
}

export default App;
We've extracted the logic directly into a custom hook. Adding console.log to each function to observe the behavior:
The scroll keeps moving, but both the scroll event and the callback are firing at a fixed interval — exactly as intended.
Wait a moment!
A question came to mind here.
The current Throttle implementation is leading — the callback fires at the start of each interval. But if we're building infinite scroll, the callback needs to fire when the user reaches the bottom of the page. What if isWaiting is true (the interval hasn't elapsed yet) right when the scroll hits the bottom? The callback would never run.
Let's test this by increasing the time value to 2 seconds.
As you can see, the scroll reached the bottom, but even after waiting more than 2 seconds, the callback never fired.
To fix this, we need to also implement the trailing behavior — so that the callback runs for the last event after the interval has passed.
Applying Lodash's Throttle and reading the source
I wanted to verify my thinking, so I applied Lodash's Throttle and looked at how they implemented it in their GitHub repository (link).
First, let's see how Lodash's throttle behaves instead of our custom one.
import { useEffect } from 'react';
import { throttle } from 'lodash';

function App() {
  // scroll event handler
  const onScroll = () => {
    console.log('scroll event');
    requestSomething();
  };

  // callback function to run on scroll
  const requestSomething = () => {
    console.log('callback called');
  };

  const debounceHandler = throttle(onScroll, 2000); // lodash throttle

  useEffect(() => {
    window.onbeforeunload = () => {
      window.scrollTo(0, 0);
    };

    window.addEventListener('scroll', debounceHandler);

    return () => {
      window.removeEventListener('scroll', debounceHandler);
    };
  }, []);

  return <div style={{ height: '1000vh' }} />;
}

export default App;
I swapped in Lodash's throttle exactly where our custom one was. To check whether trailing behavior fires when the scroll reaches the bottom, I kept the same 2-second delay.

When the scroll hits the bottom, the callback fires 2 seconds later — trailing is working! My intuition was right.
Looking at Lodash's throttle source code, it was surprisingly concise:
function throttle(func, wait, options) {
  let leading = true;
  let trailing = true;

  if (typeof func !== 'function') {
    throw new TypeError('Expected a function');
  }
  if (isObject(options)) {
    leading = 'leading' in options ? !!options.leading : leading;
    trailing = 'trailing' in options ? !!options.trailing : trailing;
  }

  return debounce(func, wait, {
    leading,
    trailing,
    maxWait: wait,
  });
}
What caught my attention here was that leading and trailing are accepted as options via the function's third argument. Taking inspiration from this, I updated our custom implementation to support leading and trailing options as well.
Step 3. Adding trailing support
Adding trailing to Throttle is essentially the same as adding Debounce logic.
The trailing behavior — running the callback for the last event after a set delay — is exactly Debounce applied to the final event!
It's a straightforward addition: just incorporate the Debounce logic into the Throttle function.
function useThrottle(callback, time) {
  const isWaiting = useRef(false);
  const timerId = (useRef < null) | (number > null); // timer ID for the debounce portion

  return (...args) => {
    if (isWaiting.current) return;

    callback.apply(this, args);
    isWaiting.current = true;

    setTimeout(() => {
      isWaiting.current = false;
    }, time);

    // Debounce logic added
    if (timerId.current) {
      clearTimeout(timerId.current);
    }
    timerId.current = setTimeout(() => {
      callback.apply(this, args);
    }, time);
  };
}
Now both leading and trailing are working!
Step 4. Adding leading and trailing options (final code)
Let's accept leading and trailing as options in the useThrottle hook arguments.
function useThrottle(callback, time, options?) {
  let leading = true; // leading and trailing default to true
  let trailing = true;

  const isWaiting = useRef < boolean > false;
  const timerId = (useRef < null) | (number > null);

  if (options) {
    // if options argument is provided
    leading = 'leading' in options ? !!options.leading : leading;
    trailing = 'trailing' in options ? !!options.trailing : trailing;
  }

  return (...args) => {
    if (!isWaiting.current && leading) {
      // leading is true and not currently waiting
      callback.apply(this, args);
      isWaiting.current = true;

      setTimeout(() => {
        isWaiting.current = false;
      }, time);
    }

    if (trailing) {
      if (timerId.current) clearTimeout(timerId.current);

      timerId.current = setTimeout(() => {
        callback.apply(this, args);
      }, time);
    }
  };
}
One thing worth noting: in the original basic Throttle implementation, when isWaiting.current was true, we returned immediately to skip all subsequent logic (if (isWaiting.current) return;). This causes a problem when both leading and trailing are true. Early returning prevents clearTimeout from running for the trailing case, so the timer ID keeps getting recreated on every event.
function useThrottle(callback, time, options?) {
  // ...

  return (...args) => {
    if (isWaiting.current) return; // prevents clearTimeout below from running

    callback.apply(this, args);
    isWaiting.current = true;

    setTimeout(() => {
      isWaiting.current = false;
    }, time);

    // ...
  };
}
Wrapping Up
We've successfully implemented both Debounce and Throttle in vanilla JavaScript and React. Both are valuable techniques for frontend performance optimization, but the key is choosing the right one for each situation and setting an appropriate delay. (If the Debounce delay is too short, the call frequency will still be high.)
I hope this was helpful.